搭建了这个静态博客以后,发现原作者使用的是外链图床。
经过摸索以后,发现jekyll支持静态图床 ,用graalVM写了个小工具,配合Typora 上传图片。

1. 引用静态图片
在jekyll根目录下image里的图片可以被静态博客引用
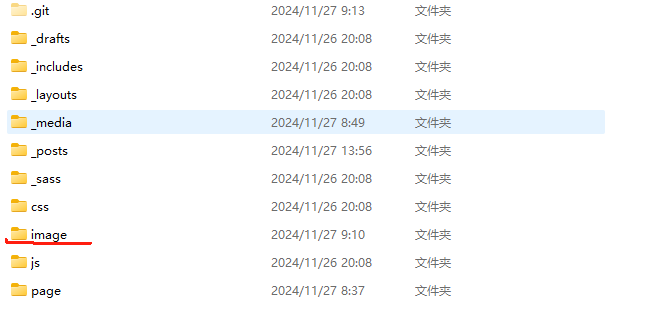
但是博文需要在 _posts中编写 ,因此博文和图片地址是分离的,需要额外设置。
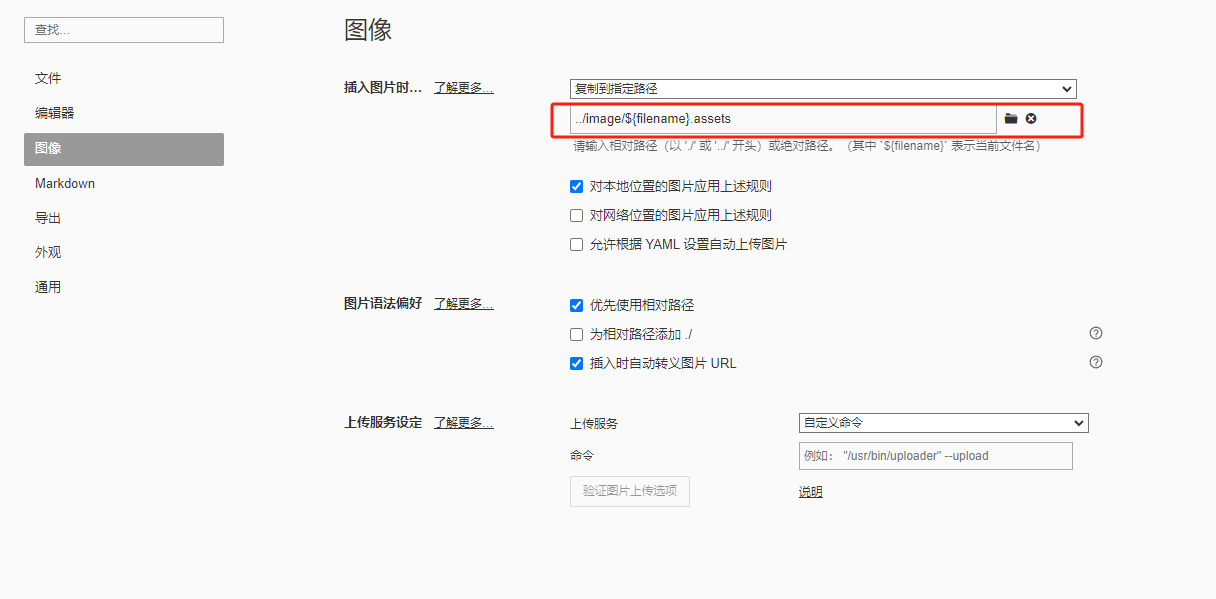
我的md编辑器是 Typora , 因此修改typora偏好设置 ,修改了相对路径。
但这样仍有问题。
md文档中引用图片的相对地址为 ../image/2024-11-27-pic-insert-modify.assets/image-20241127140116420.png
而jekyll 中引用的图片地址为 /image/2024-11-27-pic-insert-modify.assets/image-20241127140116420.png
由于没有仔细研究 jekyll到底是怎么引用静态资源的,选择使用一种 简(chou)单(lou)的方式:
编写文档时使用typora正常引用图片,并且能够预览,最终完成以后,使用分析工具进行统一替换。
2. 小玩意替换工具
2.1 思路
替换工具的思路很简单:
按行读入字符串,并匹配md图片引入的语法 。记录此时的index ,用 RandomAccessFile覆盖写入。
2.2 代码
主要逻辑100行不到的小玩意。
public class PicPathModifier {


    /**
     * 入口,分析文件内容并替换
     * @param file 文件路径
     * @return
     */
    public void analyseAndModify(File file) {
        byte[] buffer = new byte[10240];
        try (RandomAccessFile randomAccessFile = new RandomAccessFile(file, "rws")) {
            int read;
            int index = 0;
            long fileIndex = 0;
            while ((read = randomAccessFile.read()) != -1) {
                buffer[index] = (byte) read;

                if (buffer[index] == '\n') {
                    long i = dealWithLine(buffer, index, fileIndex, randomAccessFile, file);
                    fileIndex +=  i==0?1:i;
                    randomAccessFile.seek(fileIndex);
                    index = 0;
                } else {
                    index++;
                    fileIndex++;
                }

            }
            dealWithLine(buffer, index, fileIndex, randomAccessFile, file);
        } catch (IOException e) {
            throw new RuntimeException(e);
        }
    }


    /**
     * 处理行
     *
     * @param buffer 行
     * @param len 长度
     * @param fileIndex
     * @param randomAccessFile
     * @param file
     * @throws IOException
     */
    private long dealWithLine(byte[] buffer, int len, long fileIndex, RandomAccessFile randomAccessFile, File file) throws IOException {
        String originStr = new String(buffer, 0, len);
        if (originStr.matches("!\\[.*\\(.*\\.\\..*\r*\n*")) {
            System.out.println("before replace: " + originStr);

            String s = originStr.replaceFirst("]\\(\\.\\./image/", "](/image/");
            System.out.println("after replace: " + s);
            randomAccessFile.seek(fileIndex - len);
            randomAccessFile.write(s.getBytes(StandardCharsets.UTF_8));

            long writePoint = randomAccessFile.getFilePointer();
            return copyForward(writePoint, writePoint + 1, file);


        }
        return 0;
    }


    /**
     * 将文件向前拷贝。 从readIndex开始读,将读入的数据从writeIndex写  必须保证  writeIndex < readIndex
     *
     * @param writeIndex 写index
     * @param readIndex  读index
     * @param file
     * @throws IOException
     */
    private long copyForward(long writeIndex, long readIndex, File file) throws IOException {
        assert writeIndex < readIndex;
        try (RandomAccessFile writer = new RandomAccessFile(file, "rws");
             RandomAccessFile reader = new RandomAccessFile(file, "rws")) {
            writer.seek(writeIndex);
            reader.seek(readIndex);
            byte[] buffer = new byte[10240];
            int i;
            while ((i = reader.read(buffer)) != -1) {
                writer.write(buffer, 0, i);
            }
            writer.setLength(writer.length() - (readIndex - writeIndex));
        }
        return writeIndex-readIndex;
    }


}
开个项目,为它弄个Main入口 :
public class Main {
    public static void main(String[] args) {

        if (args.length > 0) {
            PicPathModifier picPathModifier = new PicPathModifier();
            File file = new File(args[0]);
            if (!file.exists()) {
                return;
            }


            if (file.isFile() && IsNameValid(file.getName())) {
                picPathModifier.analyseAndModify(file);
                return;
            }


            File[] files = file.listFiles();
            if (files != null) {
                for (File f : files) {
                    if (IsNameValid(f.getName()))
                        picPathModifier.analyseAndModify(f);
                }
            }
        }
    }

    private static boolean IsNameValid(String name) {
        return name.endsWith(".md");
    }
}
2.3 打成native-image
“做了一个native-image的春秋大梦”。
自从学会了打包native-image, 随手写的小玩意,都想搞成exe。
下面来把它搞成.exe
配置/打包 native-image 不是本文的重点。
我这里直接执行命令打包了
native-image -cp D:\localGithubRespository\PicPathModifier\target\classes com.semghh.Main -o modify
modify.exe D:\localGithubRespository\semghh.github.io\_posts\just-test.md
before replace: 
after replace: 
before replace: 
after replace: 
并且本文也使用该工具进行修改 ,如果你能成功看到本文中的图片,说明它是好使的。