紧接着上篇排查性能内鬼, 我们发现mybatis-plus数据权限拦截器默认全部接口生效。
我们对它的默认行为不满意,期望修改jar内的源码改变默认行为。
1. 源码
mybatis-plus 默认的行为:全局接口拦截,单开一个线程使用Jsqlparser分析sql语句(占用相当的性能开销),使用InterceptorIgnore注解关闭指定接口。
我们期望优雅、简单的修改三方jar的依赖,更改其默认表现。
一个可行的方法是 : 将源码down下来自行修改、编译、打包。
由于我这里只是一个小改动,mp项目使用的是gradle管理,不幸的是我对它并不熟悉 ,所以换了一种方式实现。
在DataPermissionInterceptor 中可以看到 ,判定是否需要数据权限解析借助工具类InterceptorIgnoreHelper
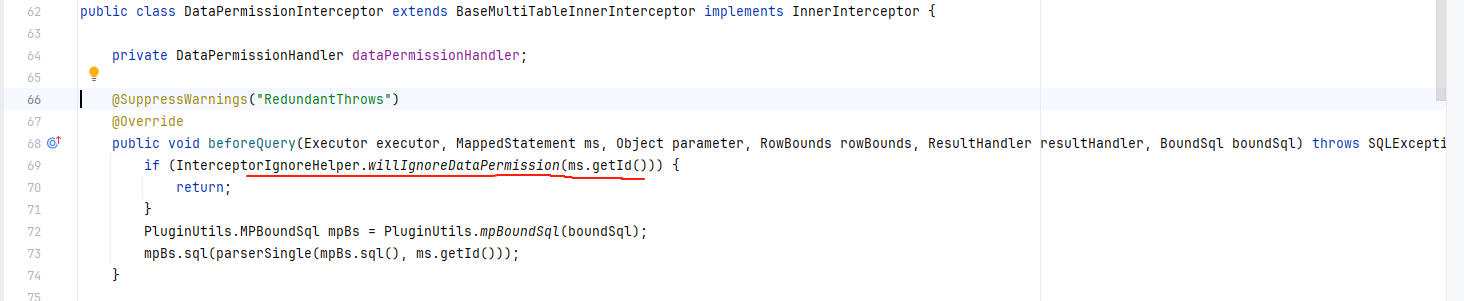
一路跟进,当接口方法没有任何声明的时候,该方法返回false。也就是 “不忽略”。 因此默认全部接口开启数据权限分析,基于项目不同会极大拖累接口响应,甚至部分数据库的特殊语法可能导致解析失败报错。
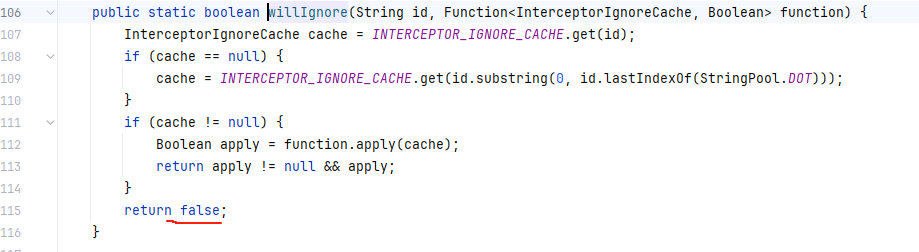
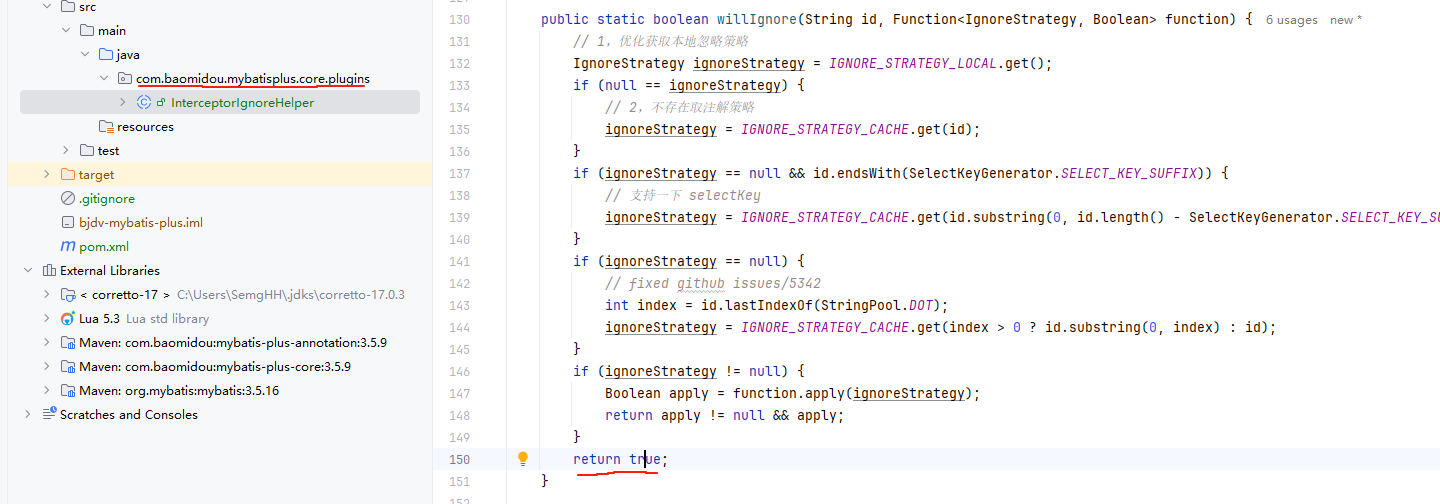
到这里思路已经很明确,我们只需要将false改为true即可。
2. 怎么做?
配置maven-dependency-plugin 插件
通过 maven-dependency-plugin 插件的 unpack 目标,我们可以将指定依赖的.class文件从jar包中解压到 target/classes中,便于我们后续打包使用。
配置如下图所示:
1
2
3
4
5
6
7
8
9
10
11
12
13
14
15
16
17
18
19
20
21
22
23
24
25
26
27
28
29
30
| <build>
<plugins>
<plugin>
<groupId>org.apache.maven.plugins</groupId>
<artifactId>maven-dependency-plugin</artifactId>
<executions>
<execution>
<id>unpack</id>
<phase>generate-sources</phase>
<goals>
<goal>unpack</goal>
</goals>
<configuration>
<artifactItems>
<artifactItem>
<groupId>com.baomidou</groupId>
<artifactId>mybatis-plus-core</artifactId>
<version>3.5.9</version>
<overWrite>false</overWrite>
<outputDirectory>${project.build.directory}/classes</outputDirectory>
</artifactItem>
</artifactItems>
</configuration>
</execution>
</executions>
</plugin>
</plugins>
</build>
|
关键点在于 unpack 目标绑定的阶段。
maven有3种生命周期 ,其中default生命周期中,有多个阶段,依次是:
1
2
3
4
5
6
7
8
9
10
11
12
13
14
15
16
17
18
19
20
21
22
23
24
25
| <phases>
<phase>validate</phase>
<phase>initialize</phase>
<phase>generate-sources</phase>
<phase>process-sources</phase>
<phase>generate-resources</phase>
<phase>process-resources</phase>
<phase>compile</phase>
<phase>process-classes</phase>
<phase>generate-test-sources</phase>
<phase>process-test-sources</phase>
<phase>generate-test-resources</phase>
<phase>process-test-resources</phase>
<phase>test-compile</phase>
<phase>process-test-classes</phase>
<phase>test</phase>
<phase>prepare-package</phase>
<phase>package</phase>
<phase>pre-integration-test</phase>
<phase>integration-test</phase>
<phase>post-integration-test</phase>
<phase>verify</phase>
<phase>install</phase>
<phase>deploy</phase>
</phases>
|
我们将unpack 绑定在 compile 之前任意的阶段都可以。
因为 unpack解压的文件会覆盖我们更改后compile的代码,因此unpack不能绑定在compile之后。
在configuration中配置好要解压的依赖,和指定目录:
1
2
3
4
5
6
7
8
9
10
11
12
13
| <configuration>
<artifactItems>
<artifactItem>
<groupId>com.baomidou</groupId>
<artifactId>mybatis-plus-core</artifactId>
<version>3.5.9</version>
<overWrite>false</overWrite>
<outputDirectory>${project.build.directory}/classes</outputDirectory>
</artifactItem>
</artifactItems>
</configuration>
|
修改源码
随后创建相同的包名,将原class文件拷贝过来,修改源码:
打包配置
一般情况下直接打包,拷贝到原工程测试即可。
按照各位自己的需要,修改依赖的坐标。
1
2
3
| <groupId>org.test</groupId>
<artifactId>test-mybatis-plus-core</artifactId>
<version>3.5.9</version>
|
排除原工程依赖 ,引入新依赖:
1
2
3
4
5
6
7
8
9
10
11
12
13
14
15
16
17
| <dependency>
<groupId>xxxxx</groupId>
<artifactId>xxxx-module-infra-biz</artifactId>
<version>2.4.1-SNAPSHOT</version>
<exclusions>
<exclusion>
<groupId>com.baomidou</groupId>
<artifactId>mybatis-plus-core</artifactId>
</exclusion>
</exclusions>
</dependency>
<dependency>
<groupId>org.test</groupId>
<artifactId>test-mybatis-plus-core</artifactId>
<version>3.5.9</version>
</dependency>
|
对于 mybatis-plus-core这个依赖来说,将一部分有用的信息打包在了 MANIFEST中 ,经过原项目工程测试后如果没有打包则会报错。
因此我们需要配置额外的信息:
1
2
3
4
5
6
7
8
9
10
11
12
13
14
15
16
17
18
19
20
21
22
| <plugin>
<groupId>org.apache.maven.plugins</groupId>
<artifactId>maven-jar-plugin</artifactId>
<configuration>
<archive>
<addMavenDescriptor>true</addMavenDescriptor>
<manifestEntries>
<Implementation-Title>mybatis-plus-core</Implementation-Title>
<Implementation-Version>3.5.9</Implementation-Version>
<Built-Gradle>8.7</Built-Gradle>
<Bundle-DocURL>https://baomidou.com/</Bundle-DocURL>
<Build-OS>Windows 10</Build-OS>
<Built-By>Administrator</Built-By>
<Build-Jdk>21.0.3</Build-Jdk>
<Build-Timestamp>2024-10-23 22:49:54</Build-Timestamp>
<Automatic-Module-Name>com.baomidou.mybatis.plus.core</Automatic-Module-Name>
</manifestEntries>
</archive>
</configuration>
<version>3.4.2</version>
</plugin>
|
编译构建
编码完成、打包配置完成以后, 直接使用 mvn clean package 即可完成绑定的unpack目标,以及compile覆盖。
在target中可以查看自己的构建产物。
打开构建产物,找到对应class, 用IDEA反编译一下即可看到效果
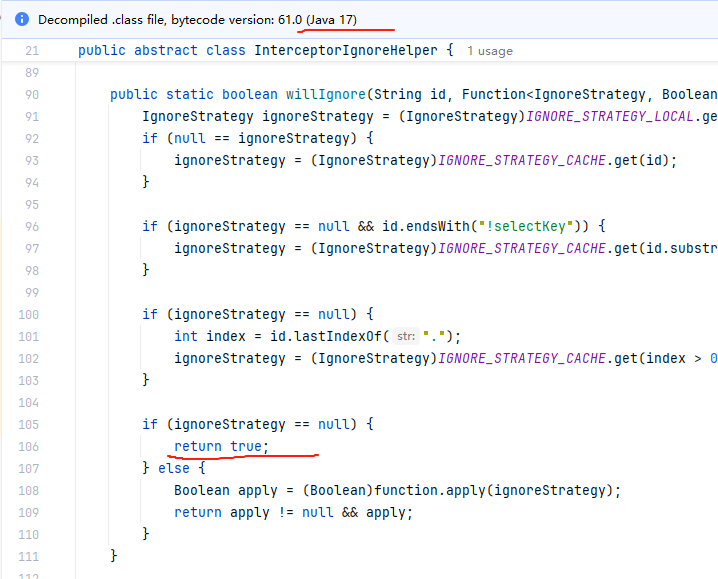
mp工程是由jdk21编译的,我们这里显示java17 并且返回true ,即可证明产物正确。
验证
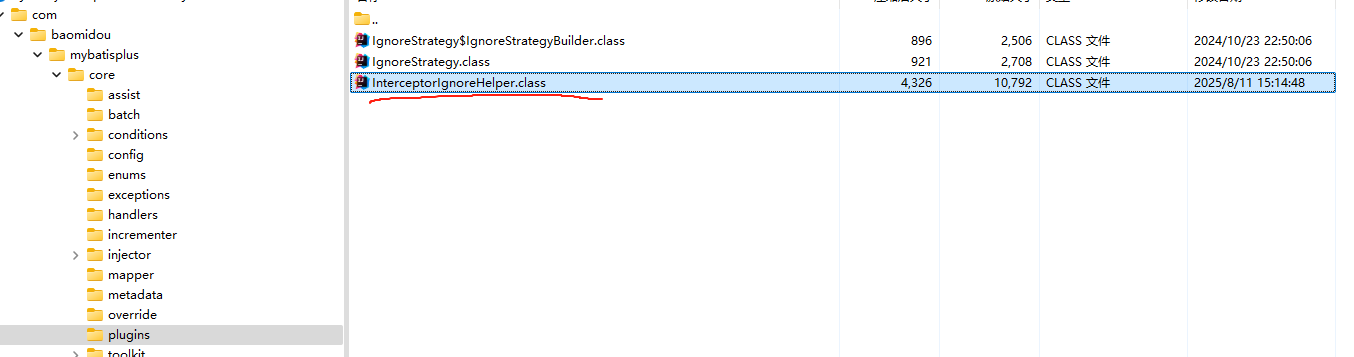
在原项目依赖中查找相关类:

发现有且只有我们自己构建的依赖,即为正确。
并测试相关接口,行为表现符合预期,即可。